


Picasso - Lino Reduction 1

LEARNING OBJECTIVE:
To follow a structured process in order to develop skilful and refined outcomes which combine techniques and processes.
TASK:
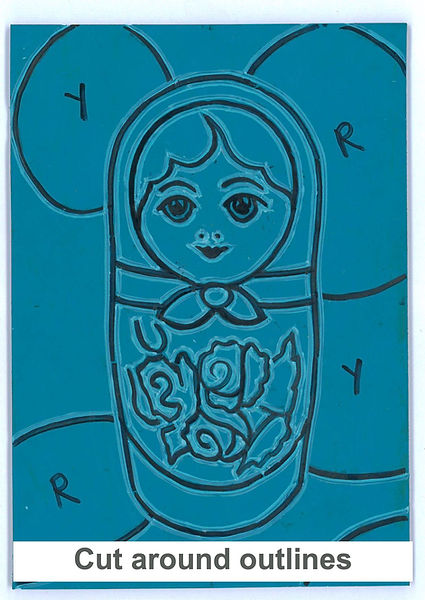
Choose a suitable key image from the still life photoshoot. Carefully draw the key contours and details of your object and background in 4B pencil onto the faded printout. Carefully rub transfer the pencil drawing onto the A5 Lino. Use marker pen to emphasise and define your pencil lines so that they stand out clearly, ready for cutting. For convenience, label the red and yellow shapes with R & Y.
MATERIALS:
Faded print, 4B pencil, A5 Lino and sharpie marker pen.
ARTISTS:
Pablo Picasso


Picasso - Lino Reduction 2

LEARNING OBJECTIVE:
To follow a structured process in order to develop skilful and refined outcomes which combine techniques and processes.
TASK:
Identify and understand the areas the you will need to cut first (see pink illustration below). You will start by carefully cutting around your outlines (but not inside the coloured shapes). Use the thin v-shaped Lino cutter for this job.
Next, you will need to use the wider u-shaped Lino cutting tool to scoop out the shapes inside your object and also in the background. Think along the lines of...whatever you cut will stay beige in the print.
MATERIALS:
Lino cutting tools, hand protectors, concentration.
ARTISTS:
Pablo Picasso


Picasso - Lino Reduction 3

LEARNING OBJECTIVE:
To follow a structured process in order to develop skilful and refined outcomes which combine techniques and processes.
TASK:
Ink up your Lino with yellow ink. Make sure you apply the ink in a nice smooth layer. Use the special measure brackets to line up your paper correctly and then roll over your paper with a dry roller to press the Lino and the paper together.
Allow the yellow print to dry and whilst it does you can start carefully cutting out the yellow shapes (to keep them yellow).
When you are ready you can ink up your Lino design with red ink and print this onto the yellow layer.
MATERIALS:
Ink, inking tray, wet roller, dry roller, measure brackets.
ARTISTS:
Pablo Picasso


Picasso - Lino Reduction 4

LEARNING OBJECTIVE:
To follow a structured process in order to develop skilful and refined outcomes which combine techniques and processes.
TASK:
Now you are familiar with the process you will start to understand the method and be much more confident in your skills. You need to complete your design by cutting out the red areas so that you can ink and print your final black layer.
Allow your Lino print to dry and compare it to the Picasso Lino reduction. Have you successfully interpreted the work of Picasso?
MATERIALS:
Ink, inking tray, wet roller, dry roller, measure brackets.
ARTISTS:
Pablo Picasso


Picasso Presentation

LEARNING OBJECTIVE:
To follow a structured process in order to develop skilful and refined outcomes which combine techniques and processes.
TASK:
Use the pre-made information boxes and artists images to create an A2 presentation template. Neatly mount up your outcomes and present them on the A2 sheet. Add your photo strip to the top of the sheet. Keep this sheet in your art folder as valuable evidence that you can create highly developed and well refined outcomes based on Picasso's artwork.
MATERIALS:
Collage/mounting papers, printer, scissors and glue sticks.
ARTISTS:
Pablo Picasso

